
TL;DR:
- Balancing artistic ambition with technical constraints is essential in game 3D modeling, from concept to engine integration.
- AI tools and modular workflows now accelerate production, enabling smaller teams to create highly detailed, optimized assets efficiently.
Every game developer knows the frustration: you've got a brilliant concept, but turning it into optimized, visually compelling 3D assets that actually run well inside a game engine is a different challenge entirely. The 3d modeling process for games demands you balance artistic ambition against hard technical constraints, and most tutorials only cover half the picture. The global 3D modeling market hit $4.56 billion in 2025, which tells you just how central this craft has become. This guide walks you through every phase, from concept prep to engine integration, with the kind of specificity that actually changes how you work.
Table of Contents
- Key takeaways
- The 3D modeling process for games starts before you open software
- From blockout to optimized mesh
- UV mapping and texturing for game-ready models
- Rigging, animation, and engine integration
- Modern pipelines and AI tools reshaping 3D production
- My honest take on what makes this process actually work
- Build better games with Proudlionstudios
- FAQ
Key takeaways
| Point | Details |
|---|---|
| Plan before you model | Gather references and define polygon budgets before opening any software to avoid costly rework. |
| Retopology is non-negotiable | Clean topology after high-poly sculpting is what separates engine-ready assets from unusable ones. |
| Texture resolution standards matter | Props use 2048x2048 while hero assets demand 4096x4096 for the right visual payoff. |
| Modular design scales faster | Reusable kit sets and standardized naming conventions speed up production across large projects. |
| AI tools reduce repetitive work | Automated retopology and batch baking free artists to focus on creative and story-driven work. |
The 3D modeling process for games starts before you open software
The biggest mistake developers make is diving straight into a modeling application without any preparation. That impulse to start sculpting feels productive. It almost always creates expensive rework later.
Concept art and reference gathering
Before touching geometry, you need a clear visual direction. Collect reference images for every major surface: material types, scale relationships, and lighting behavior. Experienced modelers build reference boards in tools like PureRef, pulling real-world photos alongside concept art to understand how light interacts with metal, worn fabric, or cracked concrete.
Choosing your tools
Software selection shapes your entire game development workflow. Here is a quick comparison of the most common tools game artists use:
| Software | Primary use | Strengths |
|---|---|---|
| Blender | Modeling, rigging, UV unwrapping | Free, full pipeline, strong community |
| Maya | Character modeling, rigging | Industry standard for animation |
| ZBrush | High-poly sculpting | Unmatched detail for organic forms |
| Substance Painter | Texturing | PBR workflow, real-time preview |
| 3ds Max | Environment and prop modeling | Strong modifier stack, game pipelines |
Technical requirements you must define upfront
Every game engine has constraints, and ignoring them until the end is a trap. Before modeling, pin down:
- Polygon budget per asset category (characters, props, environments)
- Texture resolution limits per platform
- Export format requirements for your target engine (FBX, OBJ, GLTF)
- LOD requirements and whether the engine auto-generates them or expects hand-built versions
- Naming conventions for meshes, materials, and UV channels
Standardized production rules for polygon budgets, UV layouts, and export settings are what separate professional pipelines from chaotic ones.
From blockout to optimized mesh
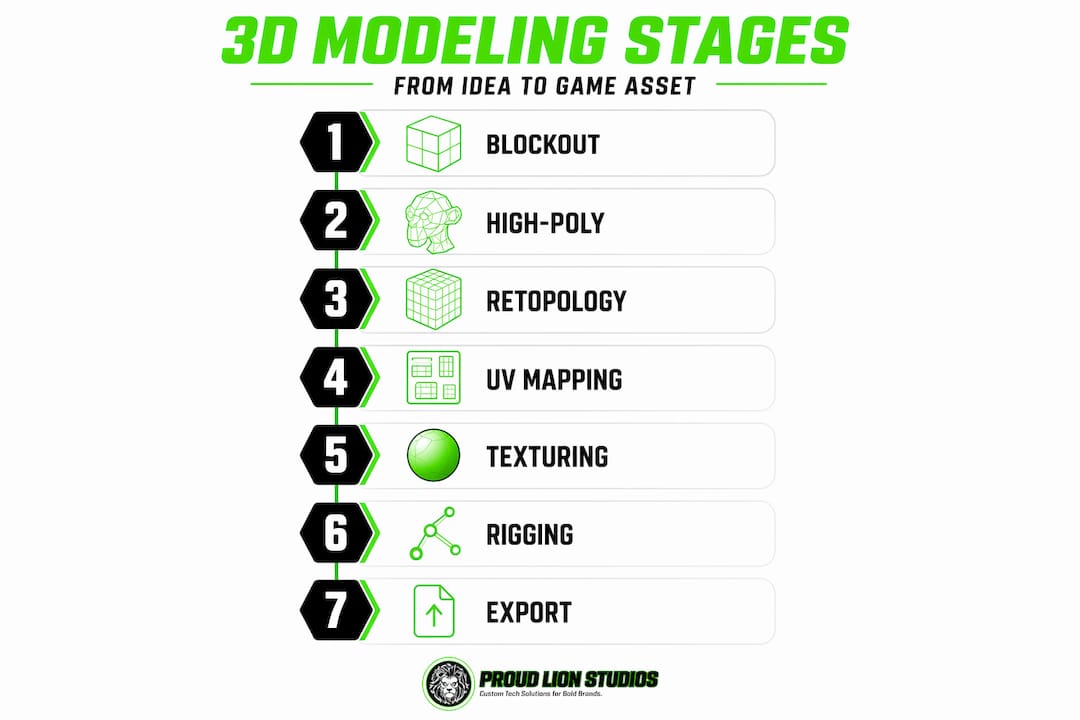
This is the core of game asset creation, and it follows a specific sequence that protects your time and your asset's quality.
Phase 1: Blockout
Start with basic shapes. Boxes, cylinders, and spheres placed to establish proportions and spatial relationships. The blockout phase is not about detail. It is about scale, silhouette, and verifying that your concept actually translates to 3D space. Get approval or self-critique at this stage. Changing a blockout takes minutes. Changing a detailed model takes hours.
Phase 2: High-poly modeling
Once proportions are locked, push into detail. For hard-surface assets like weapons or vehicles, you will use subdivision modeling or boolean operations to carve forms. For organic subjects like characters and creatures, ZBrush sculpting lets you add skin pores, muscle definition, and fabric wrinkles without worrying about polygon count at all. The high-poly model exists purely to capture surface information, which you will bake down later.
Phase 3: Retopology
Here is where many beginners lose time. Retopology means rebuilding the high-poly mesh with clean, game-ready geometry. The goals are:
- Reduce polygon count to match your defined budget
- Create edge loops that support deformation for animated assets
- Distribute polygons based on visual importance, denser in the face area, sparser on the back of a prop
- Avoid triangles in areas that will bend (joints, corners of the mouth)
- Keep quads wherever possible to maintain predictable subdivision behavior
Pro Tip: When retopologizing characters, always check your edge flow by posing the mesh in its most extreme animation positions before finalizing. A topology that looks clean in the rest pose can create pinching artifacts at 90-degree joint rotations.
The advantages of 3d modeling for games become most visible at this stage. A well-retopologized model renders faster, animates cleanly, and requires less memory, all without visible quality loss when baked maps are applied.
UV mapping and texturing for game-ready models
Texturing for 3d games is where your model gains its sense of material reality. Getting this wrong wastes all the work done in the modeling phases.
UV unwrapping principles
UV unwrapping is the process of flattening a 3D mesh into a 2D space so textures can be painted onto it accurately. The most common errors at this stage are overlapping UVs, inconsistent texel density, and poorly placed seams that appear as visible lines on the surface.
Correct UV seam placement and consistent texel density are areas where experienced modelers invest significant effort, and for good reason. Sloppy UVs make even excellent textures look amateur.
Best practices for UV layout include:
- Place seams in areas hidden from the camera or inside folds
- Normalize texel density across the entire asset before painting
- Pack UV islands efficiently to minimize wasted texture space
- Use separate UV channels for lightmaps if your engine requires it
Texture resolution by asset type
| Asset type | Resolution standard | Rationale |
|---|---|---|
| Small props | 512x512 or 1024x1024 | Low screen coverage |
| Standard props | 2048x2048 | General use |
| Hero assets | 4096x4096 | Close camera range, high detail |
| UI elements | Vector or 512x512 | Scale-independent or low complexity |
Standard game assets use 2048x2048 resolution while hero assets demand 4096x4096 for maximum visual fidelity. Assigning a 4K texture to a background crate is a performance waste. Assigning a 1K texture to your main character is a visual quality sacrifice.
Baking and PBR workflows
Normal maps simulate high-resolution surface details at minimal performance cost, but only when the baking process is executed correctly. Bake high-poly detail onto your low-poly mesh using a cage or ray-distance method, and always preview the result on a flat-lit model before adding other texture layers.
Physically Based Rendering (PBR) workflows require at minimum an albedo map (base color), a roughness map, and a metallic map. These three maps, combined with a normal map, give you materials that respond realistically to any lighting setup in your game.
Pro Tip: Texture atlasing packs multiple assets onto a single UV map, which reduces draw calls significantly. For environment sets with many small props, a single 4K atlas can outperform ten separate 1K textures in runtime performance.
Rigging, animation, and engine integration
A static mesh in a game engine is just a prop. Characters, weapons with moving parts, and interactive objects all need rigging before they can be used properly.
Building a game-ready rig
Rigging is the process of placing a skeleton inside your mesh and defining how the skin deforms around each bone. For a character, the rig needs:
- A properly scaled skeleton that matches your engine's coordinate system
- Clean weight painting so each vertex is influenced by the right bones
- Control objects or bone constraints that animators can use intuitively
- No unnecessary bones that inflate file size without adding motion quality
For engine-compatible rigs, keep the bone hierarchy shallow when possible, and confirm that your root bone position matches your engine's expected origin.
Exporting to game engines
The FBX format remains the most widely supported export option for both Unity and Unreal Engine. Before exporting:
- Apply all transforms and scale to 1.0 in your modeling software
- Check that your mesh has no inverted normals
- Confirm mesh, armature, and animation clips are named clearly
- Export at the correct axis orientation for your target engine
Pro Tip: Build a Unity-compatible export checklist and run every asset through it before delivery. Axis misalignment and scale errors are the two most common causes of re-imports that waste production time.
LODs and collision meshes
Level of Detail (LOD) meshes are lower-polygon versions of your asset that the engine displays at increasing distances. A character might have a full 15,000-polygon LOD0, a 7,500-polygon LOD1, and a 2,000-polygon LOD2. Collision meshes should be even simpler, ideally basic convex shapes, because physics calculations on high-poly geometry will tank your frame rate.
Modern pipelines and AI tools reshaping 3D production
The video game design process has changed substantially in the last two years. Production at scale now depends on systems thinking as much as individual artistic skill.
Successful modular kit-bash systems and standardized naming conventions let smaller teams produce consistent environments without rebuilding assets from scratch for each level. One team of four artists can populate an entire city block by combining a wall module, window module, and facade trim module in different configurations.
AI-assisted tools are accelerating specific parts of the pipeline dramatically. Generative AI infrastructure can increase 3D content production speed by 12x, which matters enormously when a single open-world game might require tens of thousands of unique assets. Automated retopology tools like ZRemesher and similar AI-powered options now produce clean game-ready meshes in seconds from high-poly sculpts that previously took hours to retopologize by hand.
"Modern 3d production workflows require modular, scalable asset design and AI-assisted automation to reduce bottlenecks and improve efficiency." — Scalable 3D Modeling Pipelines
The AI tools available to game studios in 2026 span texture synthesis, mesh generation, and even animation prediction. Using them well means identifying which tasks are purely mechanical (retopology, UV packing, normal baking) and delegating those to automation so your artists focus on the decisions that require genuine creative judgment.
My honest take on what makes this process actually work
I've seen talented artists produce technically perfect models that feel completely lifeless inside a game, and I've seen rough, slightly over-budget meshes that made players feel something real. The difference is always intent.
The role of 3d modeling in games is not just technical geometry. It is storytelling. A rusted door handle that communicates years of abandonment, a character silhouette readable at 50 pixels wide, a building facade that tells you the neighborhood's economic history without a single word. That kind of thinking does not come from knowing the software. It comes from asking "what should the player feel here?" before touching a single vertex.
In my experience, the developers who grow fastest are the ones who treat the technical constraints not as limitations but as creative parameters. A 3,000-polygon budget does not mean a less expressive model. It means you have to choose what to represent and what to imply, which is genuinely a more sophisticated skill than just sculpting without limits.
The other lesson I keep returning to is adaptability. The tools have changed more in the last three years than in the decade before that. Artists who committed to mastering one application exclusively are struggling. The ones who built transferable understanding of topology, UV theory, and shading principles can pick up a new tool in days. Learn the principles. The software will keep changing.
— Amal
Build better games with Proudlionstudios

At Proudlionstudios, the team brings the full 3D modeling and animation pipeline under one roof, from concept through engine-ready delivery. Whether you are building mobile game assets with tight performance budgets or developing blockchain-integrated game worlds, the studio's UAE-based team handles modeling, texturing, rigging, and integration at production scale. Proudlionstudios also offers blockchain development services and smart contract development for studios building on-chain game economies and NFT-based asset systems. If you need a partner who understands both the artistic and technical side of modern game development, the team at Proudlionstudios is worth a conversation.
FAQ
What software is best for the 3D modeling process in games?
The most common combination is Blender or Maya for base modeling, ZBrush for high-poly sculpting, and Substance Painter for texturing. The right choice depends on your pipeline and target engine.
How many polygons should a game character use?
A standard playable character typically uses between 10,000 and 20,000 polygons for the main LOD, though this varies by platform, engine, and the number of characters visible simultaneously.
What is retopology and why does it matter?
Retopology is rebuilding a high-poly mesh with clean, low-polygon geometry optimized for game engines. It is what makes detailed sculpts usable in real-time rendering without destroying performance.
What texture resolution should I use for game assets?
Props generally use 2048x2048 while hero assets use 4096x4096. Small background props can go as low as 512x512 without visible quality loss.
How does AI fit into modern game asset production?
AI tools now handle automated retopology, texture generation, and batch baking. They reduce the time spent on mechanical tasks so artists can concentrate on creative decisions and storytelling through 3D design.